An easy introduction to Lightroom - getting started

Welcome to the second in our series on getting to grips with Adobe Photoshop Lightroom 3. In the first part we looked at how next-generation photo image editing and management programs, most notably Adobe Photoshop Lightroom and Apple Aperture, but also programs like ACDSee Pro Photo Manager, and IDimager, for example, are fundamentally changing the way photographers deal with their burgeoning collections of digital images.
Get over that learning curve
I also accept that it can be difficult to comprehend the new way of preparing, adjusting, and managing your photos using programs like these, so this series aims to help you through the steep learning curve. It's not actually fundamentally difficult, just different. There is a light bulb moment when it all suddenly makes sense!
Non destructive editing
It's useful to remember that image adjustments almost never alter the original file. What you see when you make an edit is a virtual representation of that change. Each edit action is recorded in a process list that is associated with that image file. If you make some alterations to an image, these are remembered in the process list and when you view that image again the edits are applied automatically from that list in sequence, returning the virtual view of your edited image to the way it looked last time you saw it.
It's only when you come to export a copy of the image that the edits are applied to a real image. But even now the original image is not altered. Instead, a copy is made and the changes applied to that, meaning your original files are preserved.
This strategy means that the really hard work of pummeling pixels into shape only happens at the time of exporting the image. You can easily apply all or some of the edits you have settled for with one image to any other selected images. Imaging working to get one image right and then applying those same changes to hundreds or even thousands of other images taken under exactly the same conditions. There is no need to fiddle laboriously will all the images. Apply the changes from one to as many others as you wish in an instance, and then let Lightroom do the hard work of applying the changes during the export process.
Getting started - import photos
But let's not get too far ahead of ourselves. In this article we're going to look at how to get your pictures into your chosen program. This is the import stage and it is important in its own right because it can have a huge bearing on how you store and manage your images, making it easy to find and sort them later. As usual we're using Lightroom 3 this is available as a 30 day fully functional trial and you can download it from here (Mac or Windows).
(Click image to open a larger view in a new window)
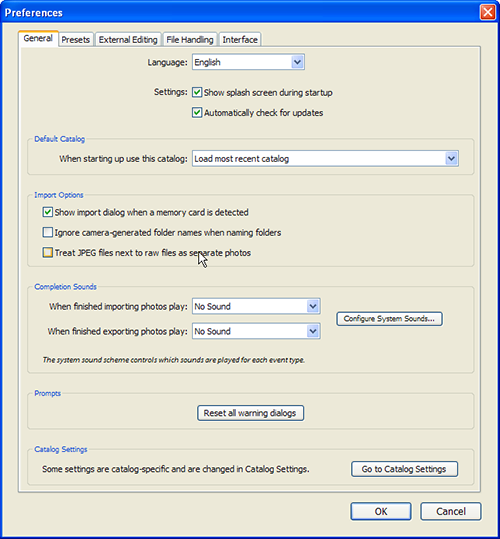
First of all it's worth having a quick look at the Preferences box (go to Edit > Preferences). Personally, I dislike automatic import boxes popping up when a memory card or camera is detected. The Preferences options will also be increasingly important the more you get to use and understand Lightroom as well.
(Click image to open a larger view in a new window)
When you open Lightroom, it will appear exactly as it did when you closed it previously. There is no need to save anything; Lightroom simply remembers it.
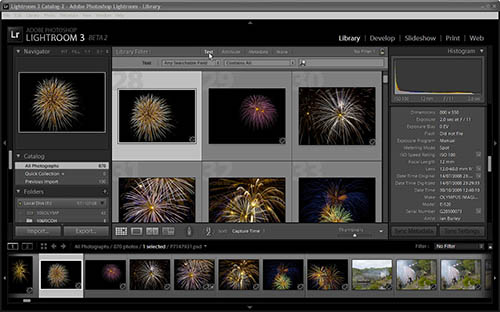
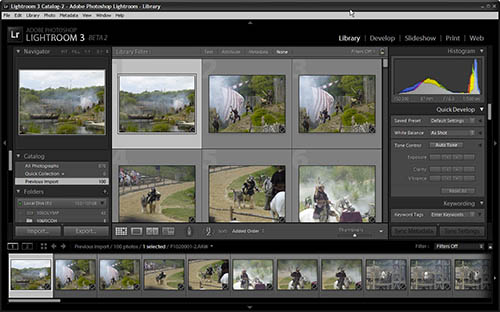
To import new images you need to be in the Library Module. This is one of five main modes that Lightroom operates in (Library, Develop, Slideshow, Print, Web) - Library and Develop are the two most important modules and we will be concentrating on these in particular.
The Library is the module that deals specifically with managing your images and controls where they are stored and how they can be accessed. It's also the module that can be used to add information about an image or simply to search for and access embedded information about one or a selection of images. In the Library you can see a strip of thumbnails across the bottom of the window and a grid view of variable sized previews of all the images in the centre. You can double click on an image to show it as a single image view in the centre. The left panel contains information about where the image is stored and information about the image is contained on the right hand panel. An exposure histogram is shown by default at the top right. You can show and hide many of the sub-panels throughout Lightroom according to your own preference in order to keep things tidy and relevant.
(Click image to open a larger view in a new window)
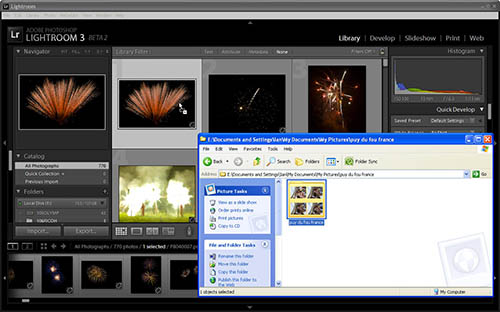
The usual way I load new images into Lightroom is by dragging and dropping either single image files or selections of several image files, or whole folders, onto the Lightroom Library panel.
(Click image to open a larger view in a new window)
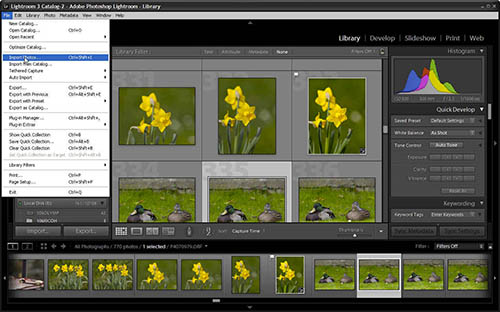
Alternatively, you can use the Import Photos option from the File menu. Or if you prefer you can use the auto-detect feature that opens the import screen when a memory card is detected in your card reader or when you connect your camera via a data cable to the computer.
(Click image to open a larger view in a new window)
Once you have started the import process, Lightroom brings up its import screen. If you have seen Lightroom 2 or earlier you will see that this is quite different in layout. At first you will see darkened thumbnails of all the images (and video files) it finds in the folder that your selected images are contained in.You can also configure Lightroom to find images in sub-folders.
(Click image to open a larger view in a new window)
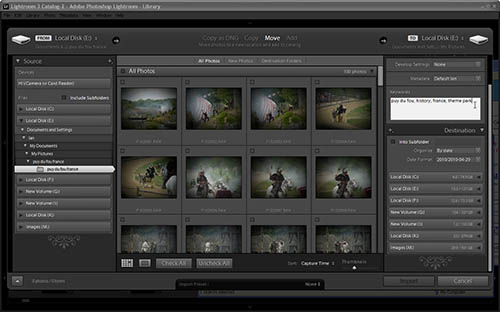
The import screen lets you tag all the images you are importing with appropriate key words so that they can be found easily in the future. You can enter them via a box at the top right of the import panel. At this stage you are tagging all the images you're importing with the same set of key words, but you can later tag individual images or different selections of images with additional key words. You can also apply the key words set to one image to any other images via a process called metadata synchronisation. This process can actually do a lot more, including apply copyright, identification and many other parameters that you can set. We'll covering this later.
(Click image to open a larger view in a new window)
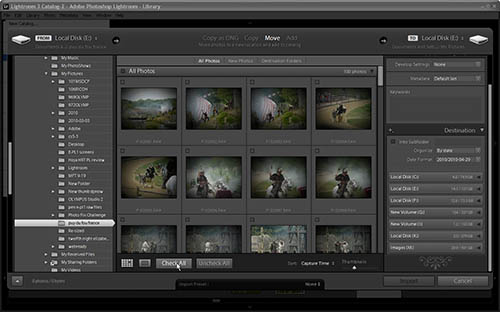
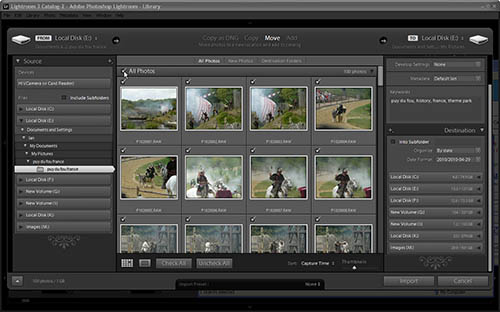
Next, select the images you want to import. You can select all by ticking the appropriate box, or tick/un-tick individual images. Selected images are shown at full brightness while un-selected images remains darkened.
At this stage you can chose the mode of import - you can move images, meaning they will be deleted from the source folder after they have been copied, or you can copy the images, which makes a duplicate copy, and you can simply use the 'add' option. This imports the attributes of the selected images but they remain where they were originally stored. This means you can continue to use your own folder structure for managing your images. Ignore the Copy as DNG option for now.
(Click image to open a larger view in a new window)
There are a lot of options concerning where to store imported images and as this is quite important, I will be covering this in the next instalment.
When you are ready, click Import and the process will commence. You can see a progress indicator bar at the top left of the panel.
(Click image to open a larger view in a new window)
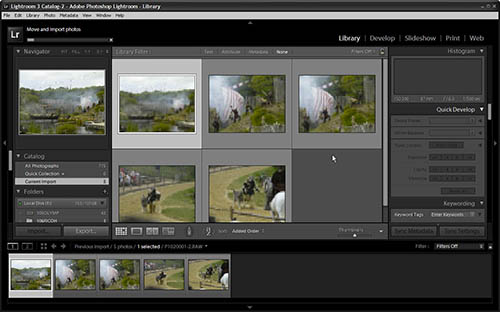
Once the import has completed, the import panel disappears and you return to the Library panel. Instead of the previous set of images that may have been visible, the Library now only shows the images that have just been imported.
You can now select each image and add key words or enter other metadata information - again we'll be covering this next time.
Summary
The import process governs several important things: which pictures will be added to the Lightroom database and where they will be stored, and also how they will be identifiable when searching for images in the future.
Next time we will look at where images are stored in more detail and how to organise your images so that they can be associated with others and generally be more accessible when you need to find them later. We'll also look at how you can navigate your way around your image database via the Library module.
If things haven't yet clicked, don't worry - there is still plenty more to cover before that light bulb will light up!
Reader feedback:
Discuss this story:


