Get yourself out of a tight situation with perspective correction

Roll your mouse pointer over the picture above to see how perspective correction can normalise falling verticals
We have all seen it, photos of buildings and other objects that look like they are collapsing because the verticals are falling inwards at the sides. This is the product of a camera angle that looks up at the subject, tilting the perspective view. Often, this is unavoidable because it's not possible to get further back, but as we will see in this article, the popular image editing software packages have various solutions for correcting the problem. We'll be looking at such tools in Adobe Photoshop Lightroom, Adobe Photoshop (both the pro-level Creative Suite version and the more affordable Elements edition) and Corel Paint Shop Photo Pro X3.
Avoid the problem in the first place if you can
If you have the space, by far the best strategy is to move back so that you can point the camera without tilting it upwards, or at least minimise the angle as much as possible. In-camera digital level tools that are increasingly found on cameras can be very useful for these situations. It's also important to get the camera as perfectly horizontal as possible and reduce the complexity of any corrections in post processing
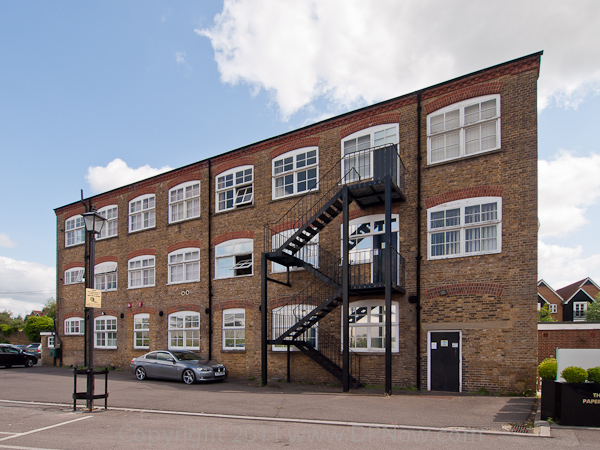
Stepping back will inevitably mean the subject occupies less of the frame, which my be counter-intuitive for photographers, but you will get a very natural perspective after the appropriate cropping away of the unwanted view, as is demonstrated below:
(Click image to open larger view in a new window) The best way to cope with falling verticals is avoid them falling in the first place by moving far back enough so the camera can be kept level while the building is comfortably all in view.

(Click image to open larger view in a new window) Once cropped, the view looks perfectly normal
Another benefit of stepping back is that you will tend to get a more complete and three dimensional view of the subject. The closer you get and the wider angle focal length you have to use, aspects of buildings like the one in our example here eventually disappear, like the roof and the side of the building.
Give yourself enough space
If you can't physically move far enough to take a normal perspective shot as demonstrated above, then at least give yourself as much space around the key subject otherwise the scope for correction may be limited. This is because the correction process stretches parts of the scene and compresses others. You end up with a trapezium shaped frame, from which a rectangular crop is made. Without enough space around the subject there is danger that the subject will either end up clipped or you won't be able to apply as much correction as you would have preferred - in order to avoid clipping the subject.

(Click image to open larger view in a new window) If you frame very tightly like this, there may not be enough room for the correction process to work without chopping off vital areas of the subject.

(Click image to open larger view in a new window) In this example the extreme top right of the building has been clipped and the bottom of the frame shows the out-of-view areas encroaching, making a rectangular crop to tidy things rather tricky.
A range of corrections
You have very flexible control over the magnitude of the corrections you can make. You might think that getting all the verticals correctly vertical would be the ideal aim, but you may be surprised to find that this isn't necessarily the case:

Here's the original un-corrected view, with sharply falling verticals on the sides. The centre is vertical, however.
This version has been adjusted so that that all the verticals are exactly vertical. In reality, it doesn't look very natural.

By leaving a little inward tilt on both sides, with the centre straight, the building is viewed more comfortably.

And this is what it looks like when the correction has been over-done. It looks silly in this example, but has potential for special effects.
Reader feedback:
Discuss this story:
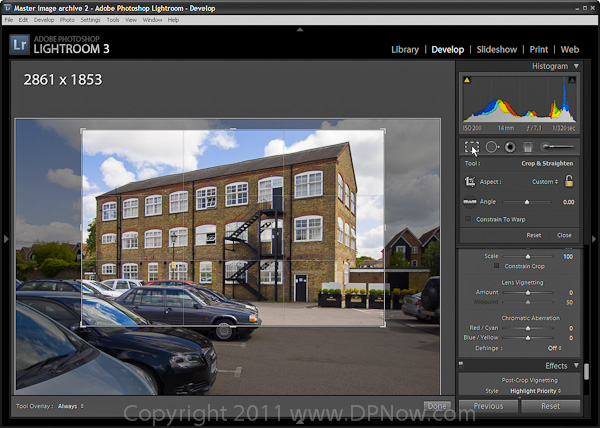
Correction in Adobe Photoshop Lightroom

Roll your mouse pointer over the picture above to see how perspective correction can normalise falling verticals
You can find horizontal and vertical perspective correction sliders in the Lens Corrections tool set in the Develop tab. It's almost at the bottom of the panel. To correct falling verticals just move the slider to the left until you get the ideal level of correction. Don't forget to ensure that the centre of the frame is straight to start with.
Use the Constrain Crop button automatically create a rectangular cropped view that matches the aspect ratio of the original frame. Certainly in Lightroom 3.4 un-ticking Constrain Crop has no effect and you need to use File > Undo to revert back to the un-constrained view if you need to.

(Click image to open larger view in a new window) The Lens Corrections tools include a Vertical and Horizontal slider to adjust perspective. Use the Vertical slider to adjust falling verticals. A grid appears and this helps align the verticals.

(Click image to open larger view in a new window) This is an unconstrained view of the correction. Click on Constrain Crop to let Lightroom make a rectangular crop view. The Rotate slider may be useful if the centre proves not to be straight.
Correction in Adobe Photoshop
Roll your mouse pointer over the picture above to see how perspective correction can normalise falling verticals
The full version of Photoshop offers a couple of ways of correcting perspective. The first uses a similar arrangement to Lightroom and is also found under Lens Corrections which is part of the Distort filter set. The second method works by adapting the crop tool to select a non-rectangular trapezoidal area to pull the sides of a picture straight.
First, lets look at the Lens Corrections method:

(Click image to open larger view in a new window) To locate Photoshop's perspective correction tools look under Filter > Distort > Lens Correction.
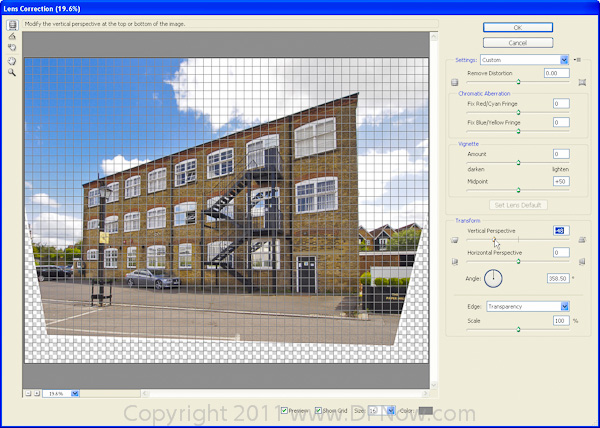
(Click image to open larger view in a new window) Under Transform, slide the Vertical adjuster as required. Unlike in Lightroom there is no Constrain Crop option, so you will need to use the crop tool afterwards.

(Click image to open larger view in a new window) In extreme cases use of the Horizontal slider can be useful to correct later perspective.

(Click image to open larger view in a new window) The alternative method, and at one time the only method for making perspective corrections in Photoshop was the to use the Perspective option in the cropping tool.

(Click image to open larger view in a new window) By enabling the Perspective option the corners of the selected crop area become independent. By lining up the sides of the crop area with the leaning verticals when the crop is executed the sides will be straightened. Here the sides have been aligned but the crop would be too close.

(Click image to open larger view in a new window) You can then pull the sides out. Here ruler guides are employed to keep the top and bottom sides of the crop area level.

(Click image to open larger view in a new window) And here is the result after the Perspective mode crop has been executed. You may notice that the picture looks laterally stretched and this highlights a weakness of this crop method; there is limited control over aspect ratio distortions. To adjust the stretch effect simply select the whole image and use the free transform option to squash the side of the frame until it looks right.
Correction in Adobe Photoshop Elements
Roll your mouse pointer over the picture above to see how perspective correction can normalise falling verticals
With Photoshop Elements (version 9 shown here) there is no Perspective mode for the crop tool, but the Camera Distortion options, although less comprehensive than the Lens Distortion tools of the full Creative Suite version of Photoshop, does provide vertical and horizontal perspective adjustment sliders:

(Click image to open larger view in a new window) You can find the Perspective adjustment tools under the filter menu, in the Correct Camera Distortion options.

(Click image to open larger view in a new window) Looking very similar to the full version of Photoshop, there are less options available, but the one's we need, Vertical Perspective and Horizontal Perspective, are there. Once you have straightened the perspective, use the standard crop tool to eliminate the unneeded borders of the frame.
Correction in Corel Paint Shop Photo Pro X3
Roll your mouse pointer over the picture above to see how perspective correction can normalise falling verticals
You get a couple of options with Corel Paint Shop Pro Photo X3; one that is similar to the Photoshop Perspective mode crop tool and a Perspective adjustment tool in the Geometric Effects tool set. We'll start with this:

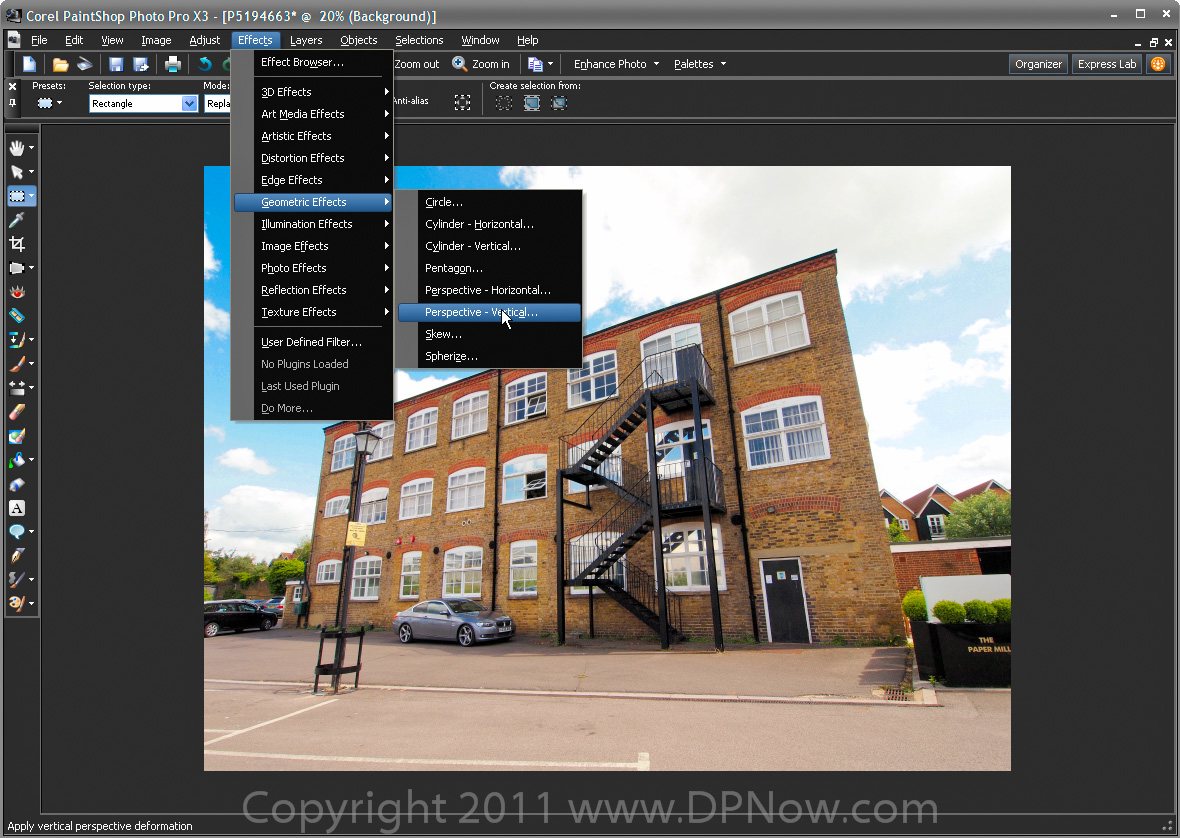
(Click image to open larger view in a new window) From the Effects menu go to Geometric Effects > Perspective - Vertical. Notice there is a Horizontal option too.

(Click image to open larger view in a new window) Dial in the amount of correction you need and off you go. In general you are left with more tidying up to do in Paint Shop Pro than with Photoshop and Lightroom.
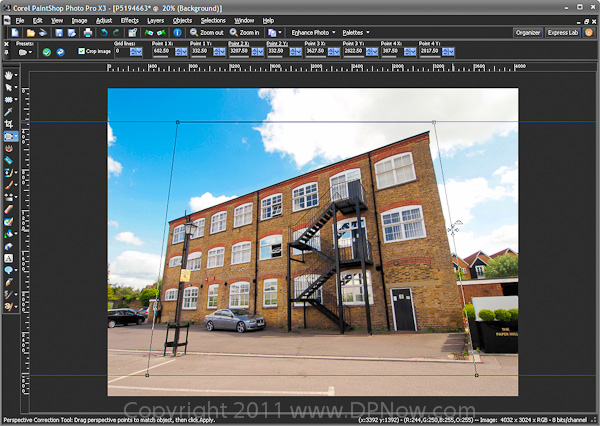
The second Corel Paint Shop Photo Pro X3 option is its Perspective Correction Tool in the main toolbox. This is basically similar to the Perspective option in the Photoshop Creative Suite crop tool:
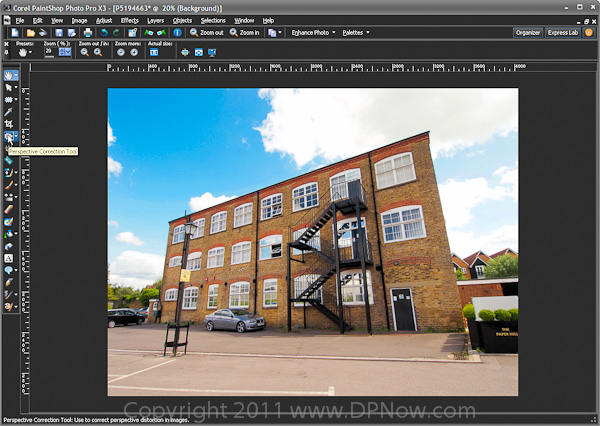
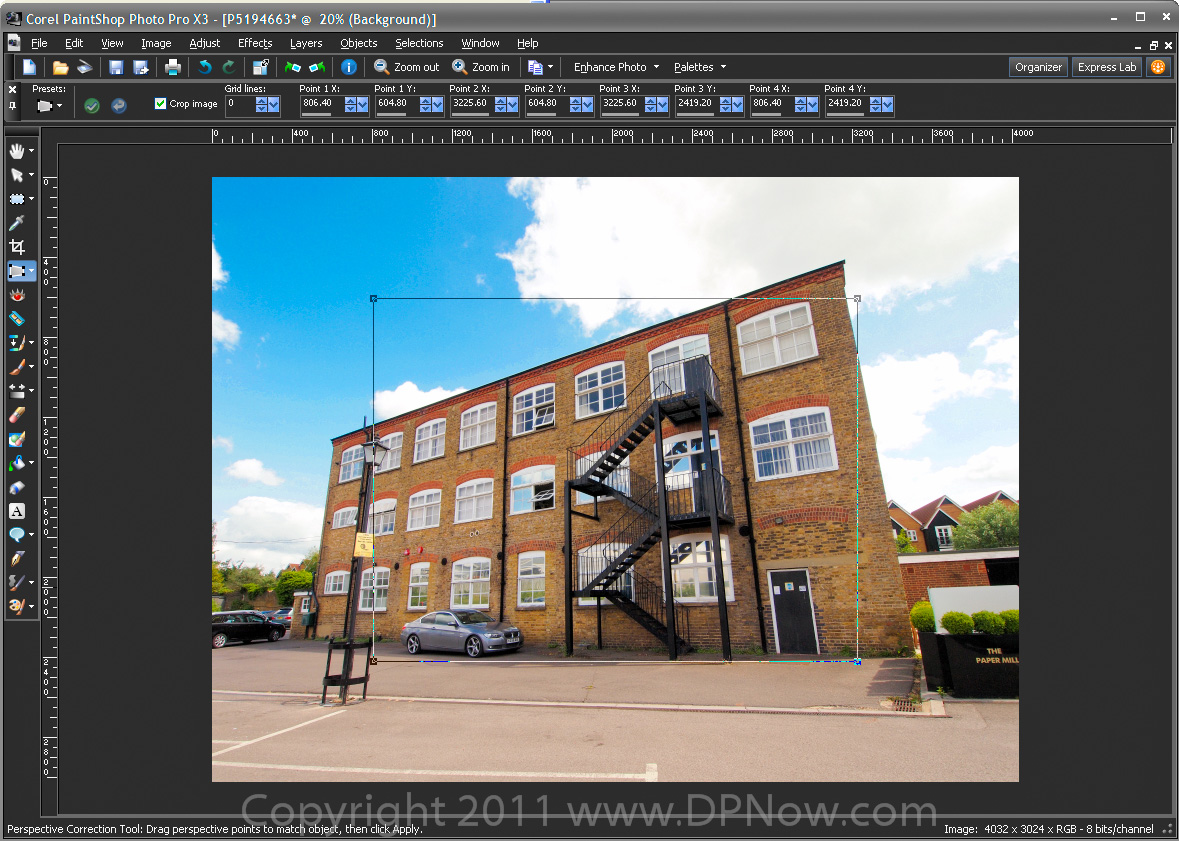
(Click image to open larger view in a new window) First select the Perspective Correction Tool in the main toolbox.

(Click image to open larger view in a new window) An alignment aid with four independently adjustable corners overlays the image.
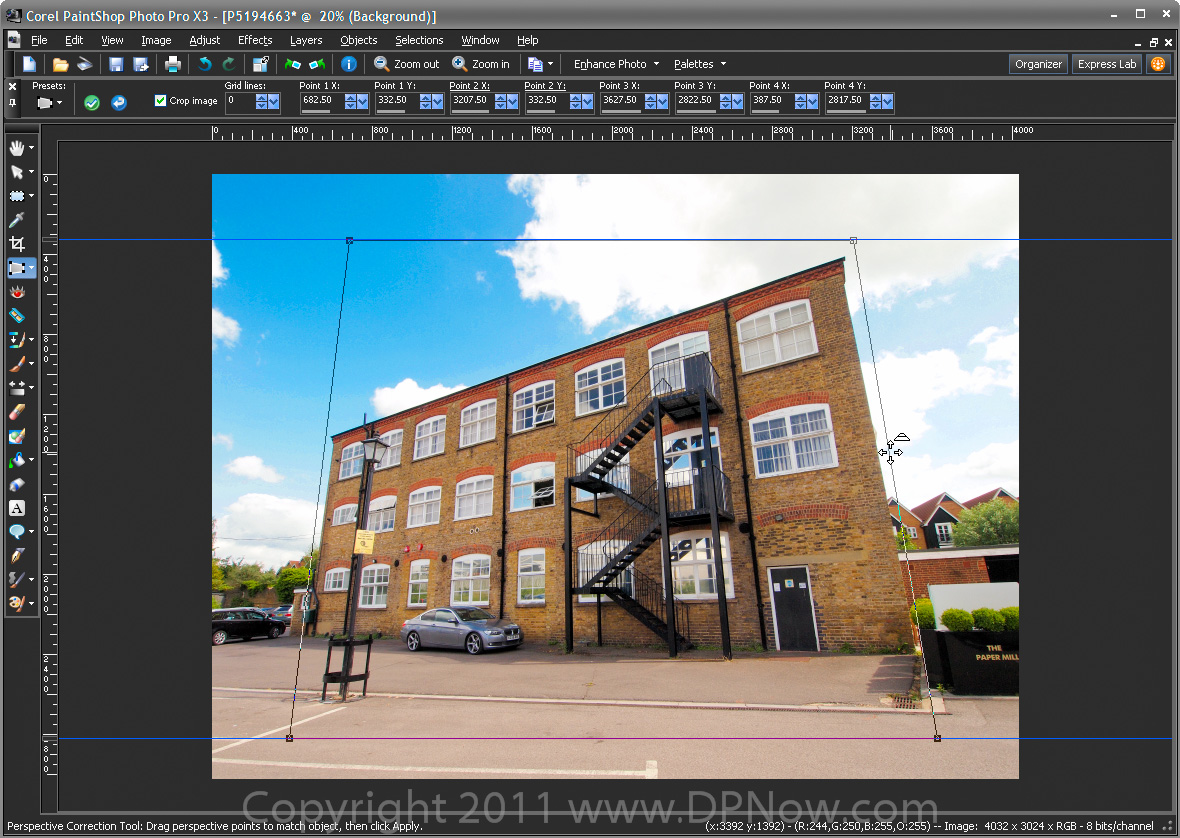
(Click image to open larger view in a new window) As with Photoshop, I've used horizontal ruler guides to keep the top and bottom of the adjustment area level.

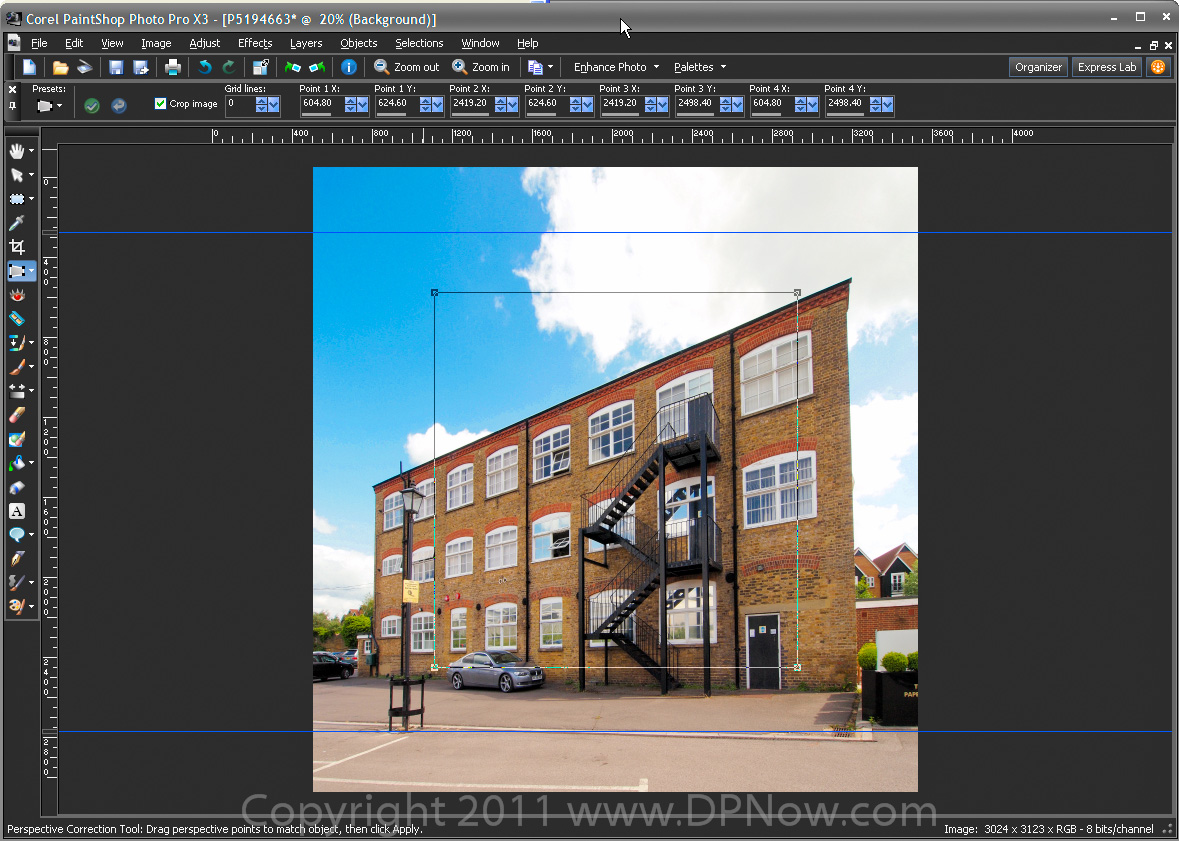
(Click image to open larger view in a new window) Once the sides have been aligned, pull back for the final framing and execute the correction.

(Click image to open larger view in a new window) Like the Photoshop method, horizontal or vertical distortion can easily result and will need correcting afterwards.