The humble aperture - one of the most fundamental tools in photography
Unlock the power of the aperture and transform your photography
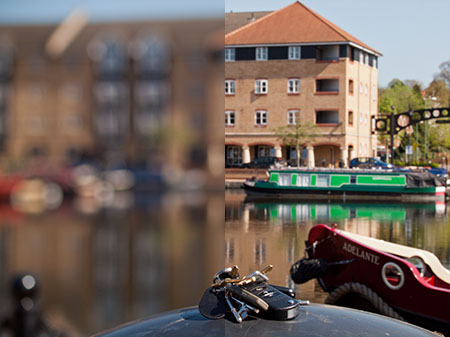
The bunch of keys in the foreground are in focus but the background on the left is definitely out of focus. The same camera and same lens were used. So what makes such a dramatic difference? The aperture used.
This article explores the impact that a full understanding of lens aperture can have on your photography. What is an aperture? How does an aperture setting affect exposure? How does an aperture help determine how much of a picture is in focus or not? How can an aperture setting dictate creative effects? How does an aperture impact on the performance of a lens? How doe aperture settings relate to different camera formats and focal lengths. These are just some of the questions we'll be exploring and answering in this article.

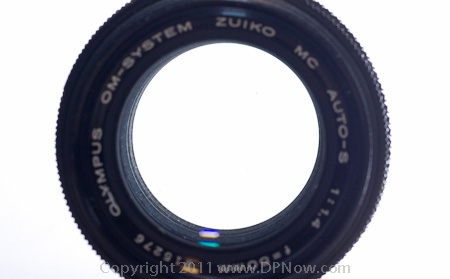
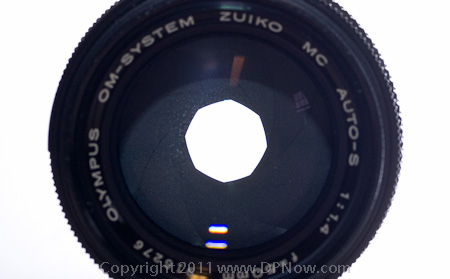
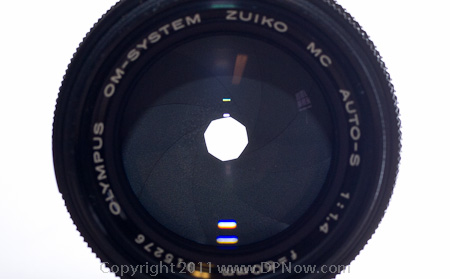
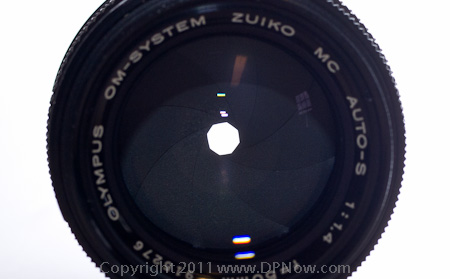
A multi-bladed iris that is typical of a camera lens aperture mechanism. This one is an 8-bladed iris.
Some lenses have less and some more blades. It's desirable to have more blades than less as the more blades you have the more uniform will be the circular shape of the aperture. More expensive lenses tend to have more iris blades than cheaper lenses. In some cameras the aperture iris doubles as the camera's shutter, and this is known as a leaf shutter. The iris closes entirely, only opening to the desired aperture setting when exposing the film or sensor.
What is an aperture?
In the simplest of cameras, a pin hole camera, the hole that lets in the light is a tiny aperture. It's also at the optical 'centre', where the ray of light from one side of the scene crosses over and projects onto the screen, film, or sensor, on the other side, which is why camera lenses project the scene up-side down.
With camera lenses that use tailored glass elements, the aperture can be much wider in diameter than a pin hole camera and still project a sharp image of the scene it is focused on. It's still at the optical centre. The wider the aperture, the more light is admitted and transmitted, so the brighter the image is.
Originally, camera lenses were designed with only one aperture size in mind. Eventually, in order to enable the photographer to adjust the brightness, and so exposure, variable size apertures were introduced in lenses. The most sophisticated form of variable aperture is an iris, named after the flower and consisting of a number of thin petals, or more commonly called 'blades' or 'leaves', that form the aperture in the centre of the lens.
f-numbers, f-stops, the value of an aperture
You will have noticed that the specification of a lens includes its focal length (or focal length range for a zoom lens) and an f-number, like f/2.8, or f/3.5, for example, which represents the widest and brightest aperture the lens can be set to. Many zoom lenses may have a maximum aperture range, like f/3.5-5.6, for example.
An f-number or the value of an aperture is calculated by dividing the focal length of the lens by the diameter of the aperture. If the focal length is 100mm and the diameter of the aperture is 25mm, then 100 divided by 25 gives an aperture of f/4.
Incidentally, the term Apterture Value also relates to a semi-automatic camera exposure mode whereby the camera's exposure meter works out the shutter speed according to the fixed aperture you have chosen, and is sometimes referred to as Av mode.
We will also be using the term 'stop' or f/stop. An f/stop is the same as an f-number and is the fractional value calcualted by dividing the focal length by the aperture diameter. One whole stop is a change of aperture that equates to a change of plus or minus one exposure value, or either a halving or doubling of the image brightness through the lens. 'Stopping down' refers to the action of reducing the aperture size.
You can see how the change in aperture size looks on a lens below:
f/1.4

f/2.8
f/4
f/5.6
f/8
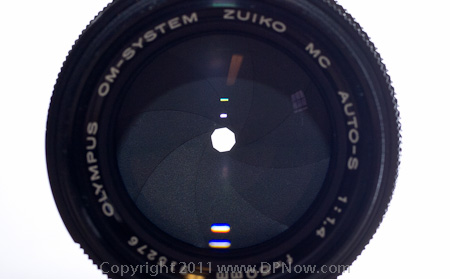
f/16
Every time you halve the light transmitted by the lens you change the exposure value by -1. It works the other way too, so an increase of 1 EV is achieved when you double the light transmitted.
| f-number |
EV difference from f/1 |
Light transmission percentage difference from f/1 |
| f/1 |
-0 |
100% |
| f/1.1 |
-.33 |
|
| f/1.2 |
-.66 |
|
| f/1.4 |
-1 |
50% |
| f/1.6 |
-1.33 |
|
f/1.8 |
-1.66 |
|
| f/2 |
-2 |
25% |
| f/2.2 |
-2.33 |
|
| f/2.5 |
-2.66 |
|
| f/2.8 |
-3 |
12.5% |
| f/3.2 |
-3.33 |
|
| f/3.5 |
-3.66 |
|
| f/4 |
-4 |
6.25% |
| f/4.5 |
-4.33 |
|
| f/5 |
-4.66 |
|
| f/5.6 |
-5 |
3.13% |
| f/8 |
-6 |
1.56% |
| f/11 |
-7 |
0.78% |
| f/16 |
-8 |
0.39% |
| f/22 |
-9 |
0.2% |
| f/32 |
-10 |
0.1% |
Zoom lenses
You may wonder why many zoom lenses have a maximum aperture that changes through the zoom range. This design policy usually relates to efforts by the lens designers aimed at keeping the size and weight of the lens to a minimum, and also to reduce cost. Zoom lens with a constant maximum aperture through the lens are usually expensive and tend to be bigger and heavier.
As the focal length of the lens changes through the zoom range, the aperture size needs to be adjusted accordingly in order to maintain the same value. If at 28mm the aperture is f/3.5 then the actual aperture diameter must be 8mm. If the aperture value is to be maintained at 50mm, its diameter needs to be adjusted to 14.3mm. At 100mm the aperture needs to be 28.6mm. But if we accept an aperture of f/5.6 at 100mm, then the diameter of the iris need only be 17.9mm. The smaller you can keep the iris, the smaller the glass elements in the lens can be, and fewer need to be used as there is less optical correction required with narrower apertures, and so the cheaper and smaller and lighter the lens can be.
Reader feedback:
Discuss this story:
Apertures and depth of field

The bunch of keys in the foreground are in focus but the background on the left is definitely out of focus. The same camera and same lens were used. So what makes such a dramatic difference? The aperture used.
The theoretically perfect 'lens' would be a tiny hole punched through a very thin opaque material. You would not need to focus a pin hole camera as everything would be in focus. That pin hole is also an aperture, but an exceptionally tiny one and it would mean the transmitted image would be exceptionally dim. With glass lens optics, you can have sharp focused images that are much brighter, although the lens needs to be focused because some of the light refracted by the lens will come to focus either in front of or behind the film or sensor plane, and so appear to be unsharp, or out of focus. The optics need to be adjusted through the action of focusing until the part of the scene you are interested in is focused on the sensor plane, and so sharp in the image.
The smaller the aperture used, the less focus variance there is and so more of the depth of the image, in front of and behind the subject you are focusing on, looks sharp. This is called depth of field, or 'dof'. The greater the dof, more of the image will appear sharp. Very shallow dof will result in the subject, or even just part of the subject, being in focus, while everything else in front of and behind the subject being blurred.

The smaller the aperture size (or larger the aperture f-number) the greater the depth of field, which means the distance in front of and behind the subject focused on that appears sharp. In the example above, everything appears to be in focus from near to far.
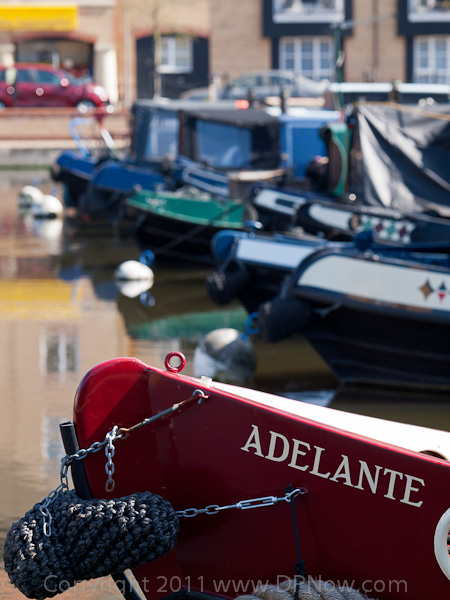
The following sequence of shots the camera lens is focused on the boat in the foreground. All that changes is the aperture (and the shutter speed in order to compensate for the change in exposure as the aperture setting changes):

f/2
f/4

f/5.6

f/8
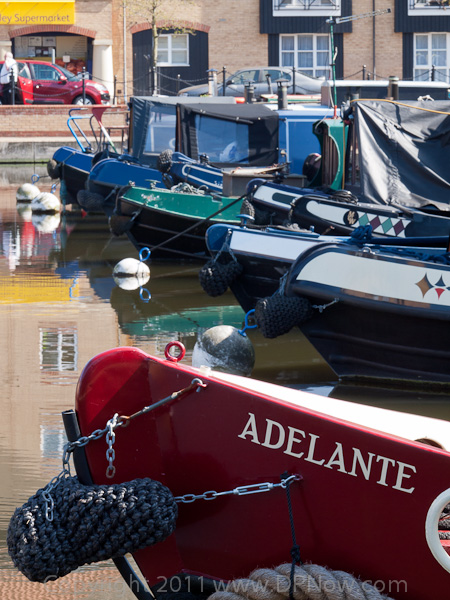
f/16
Choosing between a shallow or deep depth of field is dependent on the requirements of your composition. By choosing a shallow depth of field you can blur out the background so that the view of the subject is completely un-distracted. Remember, you need a wide aperture to achieve good background blur. The closer you are to your subject and the longer the focal length of the lens you are using the more effective this technique is. We'll explore the technique for limited depth of field on the next page.
For deep depth of field, where you want as much of the scene to be sharp as possible, the reverse is true. You need to use a narrow aperture (bigger f-number) and the shorter the focal length, or wider the view, the more of the scene will appear sharp.
You might be interested in an article we have previously published that explores the use of hyperfocal distance to help you maximise depth of field without sacrificing brightness through an excessively small aperture.
The mechanics of depth of field is a fascinating subject in its own right and deserves an article all by itself. For example, if you reproduce a scene in an image small enough, or you increase the viewing distance, everything will eventually look sharp. This is because there is a threshold point where unsharp details are no longer noticeable.

Depth of field is all relative. Everything above looks to be sharp, but zoom in on the same image...

..and you can see that the background is actually fairly blurry, while the foreground is sharp.
Apertures and film/sensor size
The bunch of keys in the foreground are in focus but the background on the left is definitely out of focus. The same camera and same lens were used. So what makes such a dramatic difference? The aperture used.
Depth of field and different camera formats
Aperture is not the only depth of field factor. The larger the frame that the camera records its image onto then the less depth of field will be viewed for a given aperture. The following two pictures demonstrate this point:

Taken using a compact camera with the same aperture as the shot below:

Taken with a compact system camera with a sensor area around six times that of the compact camera that took the first picture.
The attractively defocused background, or 'bokeh, is achieved at the same aperture as the compact camera version because depth of field for the same view and aperture reduces as the size of the camera's sensor increases, and so the focal length used, increases.
Comparing lens apertures and focal lengths for different format cameras
With cameras sporting a wide variation in film frame and sensor size, it's easy to be confused when comparing lens apertures and focal lengths, and what depth of field and field of views we can expect.
One thing that is extremely important to understand is that an aperture is an aperture, is an aperture, when it comes to brightness, no matter what size the camera is. If you have a 10x8 inch plate camera, and the exposure was correct when you set the aperture to, say f/8, at 1/125th second, and ISO 100, any other normal camera from a disposable film camera to a professional DSLR would use the same settings to achieve the same exposure when photographing the same scene.
On a so-called 'full frame' or 135 format camera, the same field of view of a 150mm lens would require a lens of focal length 100mm on an 'APS' format camera, and a focal length of 75mm on a Four Thirds or Micro Four Thirds camera. On a compact camera that same view might be matched by using a lens of focal length as small as 20mm, or even smaller.
Those of us that have used 35mm 'full frame' film cameras are familiar with camera settings used back then. f/8 was quite a sensible aperture to use for general purpose snapping,. You might stop down to f/11 or f/16 to expand the depth of field, etc. So how do aperture settings on smaller format cameras relate to settings on full frame cameras?
To match the depth of field of an aperture used on a full frame camera with an APS (1.5x cropping factor) camera, divide the full frame aperture number by 1.5. So, f/8 would give you the same depth of field as f/4 on an APS camera with a lens that has the same field of view. Here are some examples:
- Full frame 100mm f/16 would equate to APS 67mm f/10.7.
- Full frame 300mm f/11 would equate to APS 200mm f/7.3.
- Full frame 28mm f/8 would equate to APS 18.7mm f/5.3.
To match the depth of field of an aperture used on a full frame camera with a Four Thirds or Micro Four Thirds camera, which has a cropping factor of 2x, it's easy, simply halve the full frame aperture number. So, f/8 would give you the same depth of field as f/4 on a Four Thirds camera with a lens that has the same field of view. Here are some examples:
- Full frame 100mm f/16 would equate to Four Thirds 50mm f/8.
- Full frame 300mm f/11 would equate to Four Thirds 150mm f/5.6.
- Full frame 28mm f/8 would equate to Four Thirds 14mm f/4.
And the same again for a compact camera with a 5x cropping factor:
- Full frame 100mm f/16 would equate to compact camera 20mm f/3.2.
- Full frame 300mm f/11 would equate to compact camera 60mm f/2.2.
- Full frame 28mm f/8 would equate to compact camera 5.6mm f/1.6.
It's noticeable that compact cameras have a very limited aperture range compared to bigger cameras, and this is part of the reason why. The other reason is that reduced sharpness because of diffraction becomes acute with small cameras. I have covered this often overlooked issue in a separate article you may be interested in.
Shallow dof for effect and bokeh
The bunch of keys in the foreground are in focus but the background on the left is definitely out of focus. The same camera and same lens were used. So what makes such a dramatic difference? The aperture used.
Shallow depth of field is very popular for the isolating effect it can have, as well as the creamy defocused backgrounds it can create. But when the dof is very shallow, using a wide aperture (smaller aperture f-number) getting the exact point of focus becomes critical.

With limited depth of field you may need to choose carefully what you want sharply focused. Here it's the girl's right eye.

..But here it's her left eye.
The above examples were taken using a lens with an f/1.4 aperture. That's just about the widest aperture available to photographers these days, with just a few rare lenses going brighter and wider (f/1.2 and even f/0.95).
Bokeh
Made easiest by using a wide aperture (small f-number) and using a longer (telephoto) focal length, and getting reasonably close to the foreground subject, you can achieve interesting out of focus backgrounds by limiting the depth of field. The quality of the blur of the background is often referred to as the 'bokeh', which is derived from a similar sounding word in Japanese that means 'blur'.
Here are a few examples of various forms of bokeh:

Specular highlights (concentrated areas of brightness) show up in bokeh as discs like this. Notice that the discs towards the edge of the frame are more oval than circular.
These discs are actually shaped according to the outline of the aperture iris. Sometimes the discs are polygonal, and in the case of mirror type lenses the discs can be doughnut-shaped. A premium feature offered by some lenses is a near-circular iris shape that will improve the uniformity of the shape of specular highlights.

Different optics can produce different styles of bokeh. This is a relatively unpleasant or 'tortured' bokeh.

Usually, we look for a smooth and 'creamy' bokeh like this, which gives pride of place to the main subject.

If you can't get the background defocused enough you will be left with a very distracting bokeh.
If you want to experiment to achieve good bokeh, remember that a wider aperture and a longer focal length will help, and depending on the frame size of your camera, you may need to be fairly close to your foreground object to make the background blurred.
Aperture and image quality
The bunch of keys in the foreground are in focus but the background on the left is definitely out of focus. The same camera and same lens were used. So what makes such a dramatic difference? The aperture used.
The aperture setting you choose when taking a picture can have a noticeable effect on the general quality of the image. For example, many lenses will exhibit darker corners when the aperture is wide open:

Move your mouse pointer over the image above to toggle the view between f/2.8 and f/6.3.
You will see that the f/2.8 view has slightly darker corners, which is vignetting, or corner-shading, that can be reduced by closing the aperture by a stop or so. It's not too bad in this example, but some lenses and camera types can exhibit very noticeable corner shading when the lens is wide open.
Aperture choice and image resolution
Your choice of aperture can have a marked effect on the resolving power of the lens. Most lenses will be sharper if you stop the aperture down and this is usually the case up to a point, after which the sharpness decreases again. Wide-open, most lenses are slightly softer than at their peak sharpness aperture. Older lenses are often surprisingly soft at their widest aperture, while newer lenses, especially in compact cameras, can be at their sharpest wide open.
There are several reasons for the variability in sharpness according to aperture used. First of all, especially if the lens has a wide aperture to start with, the optics design has to work harder to maintain sharpness, especially at the edge of the frame. Look at the following image for a demonstration:

Frame corner sharpness according to aperture - move mouse over the image for comparison.
Move your mouse over the image, which is the extreme corner of the frame, to toggle the view between the wider f/3.5 aperture and the stopped down f/6.3 aperture. There has been no preferential processing or sharpening - the difference in clarity and sharpness, including contrast, is all down to the aperture setting. As with our previous aperture comparison demonstration you may also notice a darker view at the wider aperture because of vignetting or corner-shading exhibited by the wider aperture setting.
Another factor is diffraction. The points that form the detail of an image on the camera's sensor have a minimum size when focused perfectly onto the sensor. But when when the aperture falls below a certain size the effect of diffraction increases the spot size to the point where it is larger than a single sensor microsite, which is equivalent to an image pixel in area. Therefore the minimum point of detail the lens can project onto the sensor is actually larger than a single pixel, which means resolution is compromised. Diffraction also causes these spots to overlap and merge, which also saps resolution. For more information on the subject of diffraction limiting, check out an article on the subject we published earlier.
And don't forget that if light is not generous, by stopping down the lens you will force a longer opening time for the shutter, which means the image captured will be more vulnerable to camera and/or subject movement, which will result in motion blur.


