Hyperfocal distance and why it's handy to know about it

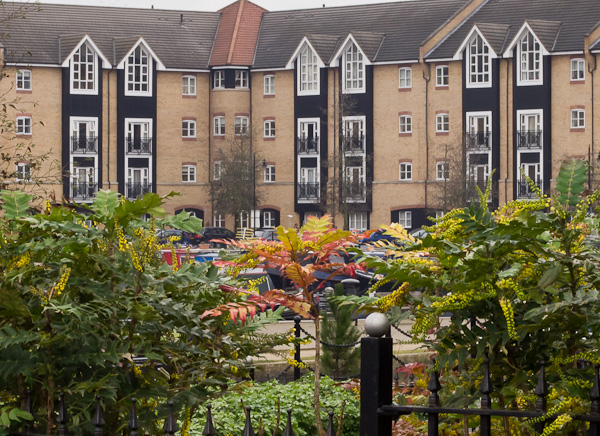
This is the full un-cropped view of the scene used in our cropped-view demonstrations below
The term 'hyperfocal' doesn't do itself any favours. For many photographers it's a technical word that switches them off immediately. But cut through the nasty jargon and you can discover some very handy knowledge that can help your photography.
If you know the hyperfocal distance for your camera's lens and aperture setting, you can set focus on your lens so you guarantee your photo will be in focus from the closest possible distance possible (if not the absolute closest possible) while also being in focus to the furthest distance, or infinity. So why is this important? If you need to get as much of the scene in focus as possible, by focusing on the hyperfocal distance you will get close to that aim, especially if your subject matter extends some distance. With wide angle lenses, or cameras with small sensors, like compact cameras, by manually setting your camera to focus at the hyperfocal distance you can practically guarantee that everything important will be in focus.
Depth of field
But first, let's look at what is in focus and what isn't. When you focus your camera on a subject, something is likely to be out of focus unless your focused on something like a wall! The distance in front of and behind the subject you are focusing on is the depth of field. You might ask, why not call it 'depth of focus'? Optical engineers claimed that term a long time ago and by convention it means the distance in front of and behind a point, like a screen or sensor plane, that a projected image is in focus. So we use the term depth of field (of view) instead.
Depth of field is directly related to the aperture and focal length of the lens you are using, as well as the size of the image frame or sensor. Below is a series of images focused on the red-tinged plant below, which was about 35 feet from the camera. An Olympus E-5 with 50mm lens was used, and this lens has an aperture range of f/2 to f/22:

1. Aperture = f/2 (These views are cropped to proved a larger view of the focused and unfocussed details.) At this aperture you can see that the buildings in the distance are clearly blurred; they are not in focus as they are too far away.

2. Aperture = f/2.8 At f/2.8 the distant buildings are slightly less blurred than at f/2, but they are still well out of focus.

3. Aperture = f/4 By f/4 the aperture diameter is reduced further and the depth of field is extending towards the buildings. They are still out of focus, but they are steadily getting less blurred.

4. Aperture = f/5.6 By f/5.6 some of the larger details in the roof are beginning to be discernible.

5. Aperture = f/8 A lot more detail in the buildings can now be resolved at f/8, although it still looks a little out of focus, especially if you compare it with f/11, below:

6. Aperture = f/11 Now, a lot of detail in the roof is resolved. The depth of field has almost reached the distance at which the buildings lie.
7. Aperture = f/16 As we reach f/16 there is very little additional resolution. Depth of field most likely reached the building inbetween f/11 and f/16. In fact by now, a new factor is coming into play; diffraction softening. This is the subject for a separate article, but basically it means all detail below a certain aperture for a lens and sensor/frame combination will start to soften because the aperture iris gets so small that light diffraction at the edges of the aperture iris blades softens the image.

8. Aperture = f/22 By now the whole picture is starting to look slightly soft.
The danger of diffraction softening
With the Olympus E-5, diffraction softening comes into play at apertures smaller than around f/8. On cameras with larger sensors the threshold aperture would be larger f-number (smaller aperture), like f/11, for example, and the reverse with cameras, especially compact cameras, with smaller sensors.
In the examples above we focused the camera on the foreground subject and by making the aperture smaller we managed to get the much more distant background into focus as well, the result of increasing the depth of field. But don't forget, depth of field extends in front of the subject you are focused on, as well as behind it. The hyperfocal distance is length in front of the camera you need to focus on so that the total depth of field that will just ensure the distant background (infinity) is in focus, without having to focus on infinity.
There are complex calculations you can make to work depth of field and hyperfocal distance out. For An Olympus with its Four Thirds sensor and 50mm lens, at f/8 the hyperfocal distance is 68.5 feet. By focusing to that distance, everything behind will be in focus and everything up to 34.2 feet in front of the hyperfocal distance (which you may have noticed is half the hyperfocal distance) will also be in focus. To demonstrate this, I took the picture below.

Aperture = f/8 but focus is set to hyperfocal distance. Everything is now in focus from the plant to the buildings in the background. As I happen to know that the hyperfocal distance for my lens and aperture setting is 68.5 feet I could simply use the distance scale on my lens to set the focus and I would know that everything from 34.2 feet in front of me to infinity would be in focus. This would be especially beneficial in low light or other situations when you can't depend on autofocus, for example. Some compact cameras use hyperfocal distance settings to boost the accuracy of autofocus for much the same reasons. Knowing the hyperfocal distance for different apertures can also mean you avoid using an unnecessarily small aperture, too.
Get yourself a depth of field calculator - and they're usually free!
So how can you find out what the hyperfocal distance is for your own camera, lenses, focal lengths, and apertures? You will need a depth of field calculator. There are smartphone and pocket computer apps available, many for free, that can do the calculations for you. For my Android phone, for example, I use a free app that is imaginatively titled: 'Depth of Field Calculator'. There are also programs you can download for your Mac or PC, and even online Web-based calculators, like the one at www.dofmaster.com.
So there you are, I hope that I have managed to demystify another nugget of photographic technical jargon and made it into something you can benefit from!
Reader feedback:
Discuss this story:


