DxO Optics Pro 5, image correction software that knows about the camera and lens you use
This is a multi-page review. Don't miss the invitation at the end of this article inviting you to nominate your images to be corrected by Optics Pro 5 and shown in a future before and after results gallery.
The latest version of DxO Optics Pro v5.3 was released in October and now that a Mac version is also available, we thought it was time to find out what its all about. What does the program do, what are the claims made of it, does it fulfil its promise and, finally, how does it compare with one of the market leading raw conversion packages, Adobe Photoshop Lightroom?
I have been a great fan of Lightroom since it was released, so I was keen to find out how it compares and whether the claims made of it are worth the cost of buying it. In fact, DxO has positioned Optics Pro to work in conjunction with Lightroom.
Whats it all about?
Essentially DxO is Raw conversion software, however because every camera and lens combination have their own unique characteristics, DxO set about with Optics Pro to test selected camera bodies and lenses and use the information learned from specific combinations of body and lens to automatically apply fine-tuned image corrections. By profiling a camera body and lens combination, the software will, in theory, apply corrections to known image quality issues. In theory this is great for bodies and lenses that DxO have profiled, but as the profiling procedure is time consuming and expensive, DxO has primarily focused on the best-selling camera bodies and lenses.
The program can also take into account distance, focal length and aperture. The end result is that it can correct lens distortion such as barrel and pincushion effect, as well as edge fall off (vignetting), colour fringing, (chromatic aberration) and lens softness. There are also corrections to anamorphic distortion, such as faces at the edge or centre of a picture which look stretched or bulbous, all corrected easily. Finally, correction of horizons and key stoning i.e. converging/diverging verticals can be corrected manually.
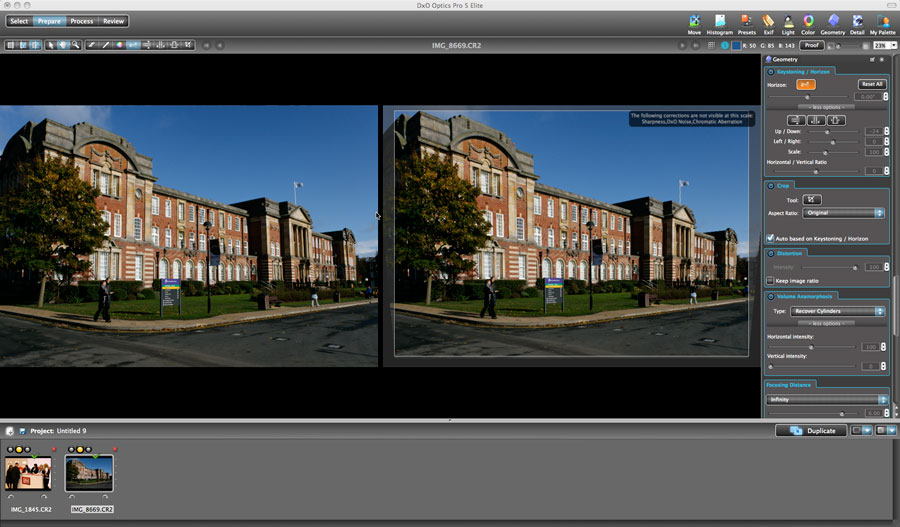
How many times have you taken shots using a wide angle lens, and people at the edge look stretched or distorted? Maybe the camera was pointed up a little and you find a curved horizon. Both are hard work to correct quickly in Photoshop. DxO seems to have it sorted with a minimum of user input. I was on a shoot the other day and I needed to photograph a large and long building with a 17mm lens. The result was that the two end corners of the building were converging. Using the Keystoning tools in DxO the problem was sorted in no time and with a click of the crop tool the shot was cropped to take account of the dead space created. To do that in Photoshop would have taken far more stages and longer, and all this is done with the raw file before processing in DxO. If Im honest I was pretty amazed when I saw it happen on screen then looked at the before and after view side-by-side.
Of course it's not all about correcting lens distortion or picture geometry, there are many other tools available to help in the raw conversion. As one would expect its easy to correct exposure, colour balance, noise, dust and chromatic aberration. Not only this but they also throw in the ability to simulate film grain for many different films.
Reader feedback:
Discuss this story:
Workflow
When I first installed the program, I struggled to work out how best to use it. In my usual way I tried to work it out by playing with it. However, there are several tutorials on the DxO site and a page in particular at www.dxo.com/intl/photo/dxo_optics_pro/workflow.
Suddenly things clicked into place and it seemed an easy and logical workflow.
The user interface is based round four tabs in the top left of the page

In Select you must browse to the folder of images on your hard drive and choose the photos you want to work on. These are dragged to the project window at the bottom of the page ready for the next stage, Prepare. Here all adjustments are made.

 |
Each of the above categories open up a fresh set of palettes on the right of the window, where adjustments can be made. If we clicked on Detail for example this set of palettes show and anyone can be switched on or off. The Process tab, takes us to a panel where you can add the files you want to process either individually or in a batch and all adjustments to these files are applied and exported to wherever you would like. Finally, its possible to Review the processed files and compare them with the originals. If you would like, the processed image can be exported directly into Photoshop or Lightroom. Integration with the two Adobe programs goes further than this though. Its possible whilst in Photoshop to go to File > Import and open DxO where your Lightroom catalogue is available. After choosing and processing a photo it is exported directly into Photoshop. |
So does it do what it says on the box?
I have already implied that DxO corrects distortion and geometry in pictures and I will come back to this later on. However, I have only briefly mentioned one of the other 'Wow' features of this program. Noise reduction, is something that Adobe Camera Raw (ACR) does in both Photoshop CS4 and Lightroom 2. In fact it seems that programs such as Noise Ninja are hardly needed these days. I shoot regularly at ISO 1600 and apply some noise reduction in Lightroom 2. However, it must be said that simply the default auto setting in DxO gives a far superior result, and will give good results at much higher ISOs.

|
| Roll mouse over image to see "after" view |
The 100% crop above was shot at ISO 1600, I have increased the exposure by 1 stop, effectively making it ISO 3200, and the default noise reduction has been applied. As you can see from the screen grab the effect is extremely marked, and bearing in mind that at normal size the effect would appear even better, one has to give an unreserved thumbs up to the people at DxO. Some adjustments such as Noise, Sharpening etc. do not show on the preview screen unless it is enlarged to 75% or above, a reminder of this is shown, but as you enlarge the frame magnification remains the same in both the As Shot panel and the Adjusted panel.
The screen shot below shows a full window in Prepare mode, with the palettes for the Colour option selected in the top right, which appear on the right of the screen. I have the raw white balance switched on and the Pick Colour (highlighted). The photo taken in a large exhibition hall with appalling almost sodium style lighting that gave a marked orange caste. By using the picker tool on the white area of the sandwich board to the left side, white balance is corrected effectively with a single click. You may also notice that one of the four tabs in the top left is missing, the Review tab. This is because in this case DxO was accessed directly from CS4 and after processing, the image is sent straight to Photoshop, so there is no need for the Review tab.
 Click image to see a larger view
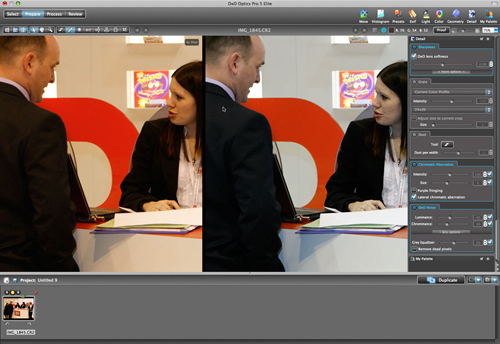
Below is another window grab showing a 75% crop of an image. One can see the 'As Shot' image is too warm. The man's jacket has an orange caste and shows evidence of colour noise. By first selecting the Colour set of palettes, a one click correction has been made, though I have then selected the Detail set as can be seen, the Sharpness, chromatic Aberration and DxO Noise palettes are switched on by default and the effect of noise reduction can clearly be seen on the right hand panel.
 Click image to see a larger view
Finally, then in this part of the review let me come back to the other main 'Wow' function of DxO, the Geometry corrections. The program will automatically correct barrel distortion and Pincushion effect. However, sloping horizons and diverging or converging verticals need to be done manually. The window grab below shoes an image of a large building and one can clearly see the things are not geometrically correct, the building has diverging verticals and really appears to leaning backwards.
 Click image to see a larger view
In the Key stoning/Horizon palette the only adjustment has been in the up/down slider. This corrects the verticals, but obviously creates some dead space in the frame. So, by switching on the Crop palette and checking the Auto box, the best crop is achieved. Pretty impressive I think and much more effort would have been needed in Photoshop to achieve the same effect.
Compared with
As I said at the beginning I was keen to compare this with Lightroom and Adobe Camera Raw. Quality software is not cheap and one has to be sure that you are using your hard earned cash wisely. From a workflow point of view I have used Lightroom since it was released, and it seemed pointless getting to know a new program if it didnt do something better, or indeed did something different to what I was used to.
Lightroom, of course, is a totally different beast to DxO, its Slideshow, Web and Print modules offer things that DxO does not. Version 2 now has the adjustment brush and gradient tool, which are lacking in DxO. It also is a powerful cataloguing and library tool.
However, if you dont need many of the above, and many dont. If its a powerful raw conversion tool you need, that corrects automatically all the faults of your optics with laboratory precision. If you need to regularly correct the geometry of your photos, or if you use high ISO camera settings, which create a need for top-notch, noise reduction, not to mention sharpening and dust removal. Then DxO has to be worth trying, and you are going to be impressed, as Im only scratching the surface of its capabilities.
Maybe it's because DxO is doing more to each individual file than an average conversion in Lightroom and ACR, but the one downside to this program seemed to me to be the time it took to process files. I tested processing the same raw file in both programs, in Lightroom it took five secs, but in DxO it took 30 secs. I tried it again with a batch of six and it took around 2 mins 45 secs. Turning off most of the key adjustments, the processing time is drastically reduced. The extra functions afforded by DxO definitely create a time trade off then, though I suppose it you were to use ACR then Photoshop to finish adjustments, the differential could well swing the other way in favour of DxO.
DxO comes in two versions, Standard and Elite. The difference seems to be in the number of camera and lens modules they work with. The Standard version supports selected amateur and expert -amateur DSLRs and lenses. Whilst the Elite version is all the above plus selected high end Pro bodies and lenses. However, it must be said that notable by their absence are any modules for the Olympus range of DSLRs, which of course would understandably mean 4/3rds users would be unlikely to buy.
In Conclusion
This software is designed for those who not only need a good raw conversion package, with exposure, lighting and colour optimisation, but also for those who find it important to have their images correctly adjusted for the different lenses they use. If this is not enough DxO will also correct colour noise when using very high ISO. It does these tasks well, and a multitude of others, some specific to your camera and lens used and with many applied automatically.
Unfortunately, Optics Pro is basically useless for users who own camera bodies and lenses not yet profiled by DxO, so do check the compatibility pages on the DxO website before buying.
The program could be seen as not really an alternative to Lightroom or Photoshop, but rather it can work with them as a plug-in and in that sense completes the array of raw tools available to the photographer. As a standalone tool though it will satisfy the needs of many pro and amateurs. For me its only real frustration was the speed at which it worked, but if you dont own Photoshop where you would normally do correction to image geometry etc. this may well not be an issue and the £199 to buy the Elite version or £99 for the Standard it could well be money well spent.
Postscript
Since writing the above, I have come across something else I feel should be addressed by DxO. If I am to compare it with ACR in Lightroom 2 and Photoshop, it is worth stating that Adobe's two programs seem more integrated than DxO does with either. For example, I can adjust a raw file in Lightroom 2, then export it to Photoshop for further editing. However if I export as a Smart Object, I can continue to use ACR in Photoshop. It would have been nice to think that I could make adjustments in Lightroom 2 using some of its unique tools, then import that file with its associated XMP or Sidecar file into DxO, and therefore take advantage of some of the great tools to be found there. At present, I can access all files imported into Lightroom 2 through DxO, but they only come as the original raw file and not with any adjustments Ive made in Lightroom. If I do it the other way and using Photoshop, I import a DxO adjusted file, it comes as a non raw file and therefore I cant take advantage of the tools in ACR. I suppose I can but dream.
The DxO Optics Pro 5 gets a DPNow Recommended award.
DPNow category ratings:
 Features
Ease of Use
 Output quality
 Speed performance
Value for Money: Standard version
Value for Money: Elite version
DPNow review ratings explained.
Overall percentage rating: 
 Overall star rating

Check the latest price or purchase options for the DxO Optics Pro via

|
|
|
|
|
| Amazon Germany is currently the only European Amazon outlet that supplies electronic goods like cameras, printers and scanners priced in Euros. |
| Each Amazon outlet can ship to most countries in the world. |
Your chance to see how effective Optics Pro can be
We thought it would be fun to invite you, the reader, to send some of your images to us to be corrected using DxO Optics Pro. If you have an RAW file of an image that is particularly distorted or in need of correction in any of the ways that Optics Pro can work, email us via [email protected] and we will build up a gallery of before and after images to be featured here on DPNow in the future.
Please note, as Optics Pro only works with selected combinations of camera body and lens, you should check on the DxO Website that your kit is supported.